What is the ChromaChecker™ Instrument Target?
There are several different versions of Instrument Inspector Targets, but all of them are based on the same list of patches.
 |
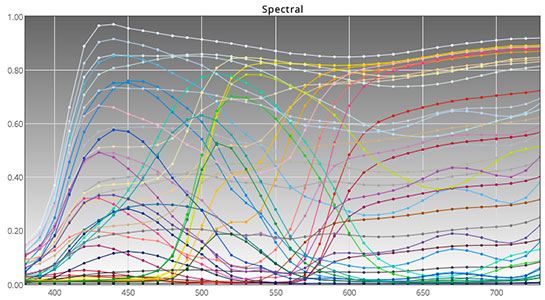
Set of 42 patches is build as a spectrally designed selection of:
Spectrally designed set to get a optimal distribution throughout the visible spectrum (at least 90% of visible spectrum i 5% steps) |
|
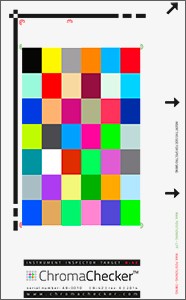
On the target there are a lot of patches, signs and marks for different automatic scanning systems. But the core of it is an array of patches 6X7 in the center oftarget. First patch is a black one, then yellow, grey, orange up to green patch number 42. This order is used to present data in reports.
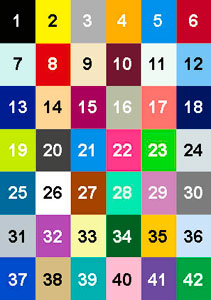 Patch order for manual mode (handheld instruments unless otherwise directed) |
 Corner patches (important for proper position) |
What are the available versions?
|
|
|
|
|
| VERSION | X-42 | B-42 | I-42 |
Patch size: |
13mm x 15,5 mm |
14mm x 18mm |
6mm x 6mm |
Notes: |
X-42 Target is designed for most instruments on the market but focused on X-Rite™ instruments (including DTP70, iSis, i1Pro, i1iO) |
B-42 Target is designed for Barbieri™ instruments.
|
I-42 Target has the same 42 patches in the same sequence + extra four CMYK patches required by ITX and InkControl software. Those CMYK patches are ignored during uploading data.
|
Consult our compatybility list for more information about currently supported instruments.
Why 42 patches?
There is a compromise between how much time we want to spend on scanning data for instrument validation, and how much data is necessary for a faithful statistical analysis. For some tests we need more data - but increasing number of patches will increase also a price and time in terms of manual measurement.
Why printed, not ceramic or metal?
- Printed version makes it possible that the same target can be easily used by variety of different instruments including scanning devices (press console). Many shops have a variety of instruments that need to be compared to one another to check for accuracy. We focused on a universal solution for all measurement devices used in everyday production.
- We use spectrophotometers for different graphic technologies - including inkjet. We expect a high degree of accuracy when assessing inkjet output. Ceramic tiles (e.g. BRCA tiles) are very different from what we measure in our day to day operations.
- When comparing different technologies, ink-jet is stable enough to produce repeatable printouts - production variations can be reduced and controlled much better than other output technology.
- Ceramic tiles are expensive and for many scanning devices they can be used only in a laboratory environment, in a very manual mode, where the instrument is disassembled by high-level trained lab technicians.
Target Life Span
Printed target is not as stable as ceramic one. Real Target's lifetime depends on several factors:
- Use of Instrument Inspector Target:
Some instruments can destroy the surface of target when measured multiple times. In some cases the rollers transporting target, or moving head can cause scratches on the target. To avoid target destruction, double check for that kind of issue before use. Ensure rollers are clean, and all mechanical parts in proper condition. Even if you are careful, hundreds of measurements can make visible changes on the laminated surface. This can cause deviations in data readings. Evaluate the surface conditions of the target carefully. - Storage of Instrument Inspector Target:
Target is sensitive to light, especially UV components. We strongly recommend to avoid any unnecessary exposure. Keep target in black, light proof envelope when not in use. - Maintenance of Instrument Inspector Target:
Keep it completely clean. If necessary clean it gently with soft textile. It should be almost dry - just few drops of water can be used. Whenever cleaned with water wait at least two hours before use. Never use solvents or any aggressive materials for cleaning purposes. - Age of Instrument Inspector Target:
Every year some patches can change due to aging, even though the substrate is inks are extremely stable and tested for colorfastness. Typical color change due to normal usage is . 3∆E (00). It can dramatically increase when Target is not properly maintained or the surface is damaged, or dirty.
Spot patches instead of CMYK
Instrument Inspector Target is based on spot colors not a CMYK. About 50% of patches are out of typical offset printing gamut (GRACol2006_Coated1v2):

However for evaluating different software programs, all patches have virtual RGB and CMYK values.
Values in the following table are not exact but can be used to setup capturing software:
| ID | R | G | B | C | M | Y | K | ||
|---|---|---|---|---|---|---|---|---|---|
| 1 | 4 | 4 | 3 | 90 | 79 | 65 | 95 | ||
| 2 | 255 | 253 | 21 | 6 | 0 | 100 | 2 | ||
| 3 | 170 | 168 | 171 | 40 | 29 | 29 | 6 | ||
| 4 | 254 | 149 | 18 | 0 | 38 | 100 | 0 | ||
| 5 | 24 | 183 | 255 | 98 | 25 | 0 | 1 | ||
| 6 | 223 | 5 | 49 | 0 | 100 | 84 | 23 | ||
| 7 | 198 | 251 | 223 | 28 | 1 | 14 | 0 | ||
| 8 | 244 | 21 | 16 | 0 | 98 | 100 | 6 | ||
| 9 | 240 | 223 | 172 | 14 | 12 | 34 | 0 | ||
| 10 | 135 | 17 | 72 | 21 | 99 | 53 | 62 | ||
| 11 | 234 | 250 | 235 | 16 | 2 | 11 | 0 | ||
| 12 | 126 | 213 | 255 | 60 | 11 | 0 | 0 | ||
| 13 | 8 | 28 | 225 | 100 | 82 | 0 | 32 | ||
| 14 | 246 | 191 | 130 | 7 | 24 | 51 | 0 | ||
| 15 | 185 | 12 | 138 | 14 | 100 | 16 | 32 | ||
| 16 | 183 | 189 | 147 | 38 | 22 | 41 | 2 | ||
| 17 | 255 | 69 | 107 | 0 | 71 | 58 | 0 | ||
| 18 | 1 | 24 | 173 | 100 | 80 | 0 | 56 | ||
| 19 | 215 | 255 | 16 | 32 | 0 | 100 | 0 | ||
| 20 | 81 | 81 | 85 | 75 | 63 | 61 | 56 | ||
| 21 | 57 | 162 | 255 | 87 | 35 | 0 | 0 | ||
| 22 | 255 | 25 | 166 | 0 | 90 | 17 | 0 | ||
| 23 | 135 | 255 | 11 | 68 | 0 | 100 | 0 | ||
| 24 | 206 | 223 | 221 | 27 | 11 | 14 | 0 | ||
| 25 | 27 | 154 | 166 | 100 | 19 | 2 | 39 | ||
| 26 | 255 | 255 | 255 | 9 | 4 | 5 | 0 | ||
| 27 | 194 | 60 | 17 | 0 | 75 | 100 | 40 | ||
| 28 | 102 | 255 | 108 | 63 | 0 | 55 | 0 | ||
| 29 | 202 | 94 | 213 | 26 | 61 | 3 | 0 | ||
| 30 | 130 | 128 | 134 | 57 | 46 | 45 | 18 | ||
| 31 | 183 | 196 | 202 | 36 | 19 | 19 | 2 | ||
| 32 | 163 | 35 | 240 | 44 | 85 | 0 | 0 | ||
| 33 | 243 | 252 | 141 | 15 | 1 | 51 | 0 | ||
| 34 | 60 | 187 | 6 | 100 | 0 | 98 | 51 | ||
| 35 | 255 | 182 | 20 | 0 | 24 | 100 | 1 | ||
| 36 | 204 | 233 | 255 | 32 | 8 | 3 | 0 | ||
| 37 | 28 | 64 | 255 | 100 | 73 | 0 | 3 | ||
| 38 | 214 | 179 | 108 | 27 | 28 | 59 | 0 | ||
| 39 | 31 | 246 | 123 | 100 | 0 | 46 | 0 | ||
| 40 | 255 | 142 | 215 | 2 | 40 | 8 | 0 | ||
| 41 | 95 | 61 | 215 | 76 | 84 | 0 | 1 | ||
| 42 | 69 | 254 | 4 | 100 | 0 | 98 | 2 |
Instrument Inspector Manual
To use Instrument Inspector one of ChromaChecker™ Instrument Inspector
Targets is required. To buy visit to IDEAlliance
![]()
Instrument Inspector – How does it work?
Why use Instrument Inspector?
Instrument Inspector Target
Baselines and data averaging
How to start-up?
Instrument Inspector menus - how to navigate?
Easy mode / Expert mode
Data sharing
Instrument's comparison
Instrument’s compatibility list
General rules
FAQ
Tricks and Tips
![]()
Supported Instruments – manuals
X-Rite i1 Pro 1
X-Ritei1 Pro 2
X-Rite i1iO
X-Rite iSis
X-Rite DTP-70
X-Rite Intelitrax
X-Rite eXact – manual mode
X-Rite eXact – scan mode
X-Rite 530
X-Rite 939
X-Rite SpectroEye & other from X-Rite
Techkon Instruments
Barbieri instruments
